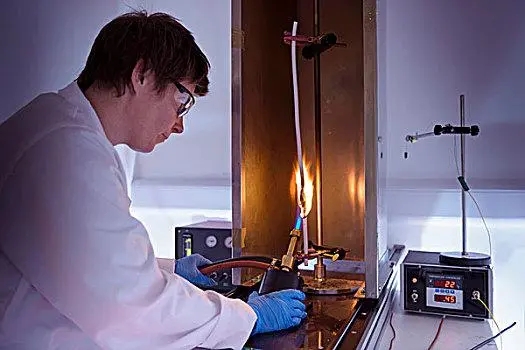
Vertical flame testing process:
1. Click the return to main control page button to enter the main control interface.
2. Click the start test button to enter the test control interface.
3. Take out the pre processed sample and place it on the stainless steel mesh on the sample placement slot, then close the combustion chamber door.
4. Click the start test button, and the sample holder will automatically move into position and ignite. At this time, the timer will time separately. There are sample ignition button, sample extinguishing button, sample burnout button, and fuzzy mark button in the timing area. After clicking these buttons, the corresponding time will be recorded separately; The phenomenon marking area includes the sample melting button, sample dripping button, sample foaming button, and sample carbonization button. After clicking these buttons, the corresponding combustion characteristics are recorded.
5. After the 4-minute test time expires, the sample branch will automatically return and a single test report will pop up. Click Save at the bottom of the page and click OK.
6. Open the exhaust manual valve and click the exhaust button. After the exhaust gas is exhausted, open the door to remove the remaining material and replace it with a new sample. Click the reset button and repeat the above operation to complete the remaining two test operations.
7. After completing the horizontal and vertical combustion tester three times, click on the test summary button, and the system will pop up the test summary. Click on the plot curve in the summary table to complete the SDR smoke density development curve.
8. Click OK below the report to return to the test control interface. Click the print button. If a USB flash drive is inserted, the report will be transmitted to the USB flash drive. If a printer is connected, the report will be printed. Clicking data reset will reset the test data and proceed to the next test.